enter data manually
|
- Open the budget season you want to edit.
- Select the Income or Expenses tab (depending on what you are entering).
- Select whether the amount you are going to enter is GST inclusive or exclusive.

- Select the edit button beside the heading you want to add data into.

- Enter the data into the months the income/expense falls on.
- Select the Update button to save the data.

|
enter using spread now
|
- Open the budget season you want to edit.
- Select the Income or Expenses tab (depending on what you are entering).
- Select whether the amount you are going to enter is GST inclusive or exclusive.
- Select the heading you want to add data into. The heading should turn grey.
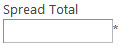
- Add a value into the Spread Total box.
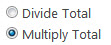
- Select whether you want divide or multiply the total.
- Press the Spread Now button.

Any values already in the budget will be added to, but not headings with worksheets associated with.
|
using a worksheet
|
- Select the heading you want to add the worksheet to.

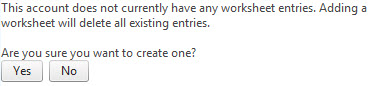
- Select the Worksheet button.

- Answer Yes to the question.
- Click on Add new record.

- Add the details for the gross margin.
.jpg)
Date of Cashflow - date you expect cashflow to happen.
Account Code - allows you to apply a secondary heading to the budget.
Description - allows you to add in more details.
Units - number of units for the transaction, i.e. number of sheep, tonnes of wheat.
Unit Price - price for each unit, i.e. price of sheep.
Unit Total - works out unit(s) * unit price.
Work Date - optional date of work, i.e. if the crop was harvested (work date) a month earlier, but cash does not come in until the next month (Date of Cashflow).
Season - which season the transaction is assigned to.
You can also use the calculator button:

- Select the tick to save the row.
- Repeat Steps 4 to 6 to add more details to the heading.
- Once you have added all the details, select the Close button.

|